Quantcast
Channel: SAP CRM: Master Data & Middleware
Viewing all 62 articles
Browse latest View live

PPR vs Listings

$
0
0

From CRM 5.0, we have both PPR and Listing functionality available in SAP CRM. So, its really confusing to decide which one among them can be used to
meet the business requirement, because same can be achieved by using PPR as well as Listings functionality. So which one among them is best suited for your business?


Before proceeding further, let us familiarize ourselves with their definitions first:


Partner/Product Ranges (PPR) is basically a combination of accounts and products that are valid for a specific time period.


Listings can be used to determine the products, which can be ordered by and offered to a customer for a particular time period via a certain sales channel.


Exclusion can be used to determine products, which cannot be sold to a customer for a particular time period.


During CRM 4.0, listing functionality was present only in R/3 but there was no integration of listing functionality with CRM. In CRM, same listing functionality was covered by Partner/Product Ranges (PPR). But flexibility of listing definition using PPR was not sufficient due to below reasons:


  • no customer specific key fields
  • no combination of account hierarchy with additional attributes


Motivation behind New Listing Functionality in CRM 5.0:


  • To leverage the advantages of R/3 Listings and PPRs
  • To provide seamless integration between R/3 and CRM Enterprise
  • Combine condition technique (listing header) and PPRs (listing items)


Below table clearly points out the difference betwen PPR and Listings functionality:


Key Features and DifferentiatorsPPRListings

Exchange listing information between

  • R/3 and CRM
X
  • CRM Enterprise and MSA
XX

Use product proposal in

  • Activity Journal
XX
  • Order (only MSA)
XX

Use listing check in

  • Order
XX
  • Marketing
XX
  • Account Planning
XX

Listing maintenance

  • Generic
XX
  • CP specific enhancements
X
Customizing
  • Process driven customizing for better fine tuning
X
Define listings for
  • Single account
XX
  • Account hierarchy node
XX
  • Target group
XX
  • Combination of account hierarchy node and additional attributes
X
  • Customer specific fields
X
  • Any customer attribute (e.g: region, customer group field)
X
Listing Items
  • Product, product category, product catalog
XX
  • Customer specific product fields (e.g: zz_prod_nr)
X
  • Any product attribute (e.g: brand)
X

Additional attributesforlistingitemsas

  • Additional information (e.g: listing price)
XX
  • Key fields (e.g: zz_prod_nr, brand)
X


With this I would like to conclude that, Listings in CRM is preferred solution for new implementations and for customers who require R/3-CRM
integration. It also provides high flexibility for listing definition and determination and better performance.


External Interface (XIF) Setup

$
0
0

Your business requirement is to transfer the data created/modified say a product, a BP or an individual object (vehicle, equipment etc) from one CRM system to another CRM (or non-SAP) system, automatically.


Example: Products created in development system should automatically get replicated to test/quality environment.


In case of SAP CRM and SAP ECC integrated scenario, this can be achieved by activating delta download feature provided by CRM Middleware. If this is not the case, then XIF adapters can be used to achieve the same.


There are 2 scenarios involved here:


  • Outbound direction (to push the data from the system, so that other system can consume it)
  • Inbound direction (to pull the data into the system)


This means that using XIF adapters, it is possible to import/replicate the data which is already present in some other system (SAP or non-SAP) into SAP CRM or to push the data from the current SAP CRM system into another system (SAP or non-SAP) automatically.


To check whether XIF feature is supported for a particular application (Inbound/Outbound), you can refer the below customizing path:


SPRO-->IMG-->Customer Relationship Management-->CRM-->Middleware and Related Components-->Exchanging
Data With External Components-->XIF Adapter Setup-->Overview


You can also go to transaction: SXDA and then navigate to,  Goto-->DX Program Library and check for the registered programs to know the function module, documentation or the test report, to test the scenario.


For example, CRMXIF_PRODUCT_MATERIAL_SAVE is the FM for Inbound, for object PRODUCT (BUS1178). And you can use the report: CRMXIF_PRODUCT_MATERIAL_TEST to test Outbound scenario.


Setting up XIF for Inbound/Outbound is very simple and it hardly takes about 30 minutes, if necessary authorizations are in place.


I will take an example of automatically replicating vehicle data (individual object with object family 0601) from one client (558) to another client (800) of same CRM system (Q0C), for demonstration purpose. But please note that the same set up can be used to transfer data from one CRM system to another SAP or non-SAP system.


In below demonstration, System Q0CCLNT558is aSource System (Outbound direction) and System Q0CCLNT800 is a Destination Sytem (Inbound direction), so that vehicles created in Q0CCLNT558 automatically gets transferred to Q0CCLNT800, without any manual intervention.


Below are the steps involved.


1) Define RFC Connections


This has to be done in both Source and Destination Systems.


In source system, you need to define an RFC connection for target system and vice versa.That is, in Q0CCLNT558 define an RFC connection for  Q0CCLNT800 and vice versa.


This can be done via transaction SM59, ABAP Connections, use Create button. If there exists, already an RFC connection for destination, then no need to create it again.


But make sure that RFC connection works fine using button ‘Connection Test’, before you proceed further.


In Q0CCLNT558:

RFC1.png

In Q0CCLNT800:

RFC2.png


2) Ports in IDoc processing


This has to done only in the source system, in this case Q0CCLNT558.


Check using transaction WE21, under Transactional RFC, whether a port (example: A000000001) already exists for your RFC destination (Q0CCLNT800)? If not, then you need to create a port using Create button for Transactional RFC.Choose ‘Generate Port Name’ and in the next screen provide description and RFC Destination (Q0CCLNT800).


In Q0CCLNT558:

WE21.png


3) Generate/Maintain Partner Profile


This can be done via transaction WE20, under Partner Type LS (Logical System) and has to be done in both the systems.If there exists already a Partner Profile, no need to create once again.


In source system (Q0CCLNT558), there has to be an entry for destination system (Q0CCLNT800) under Partner Type LS. And for this Partner Number, add an entry under Outbound Parameters using ‘Create outbound parameter’ button as below:


Message Type = CRMXIF_PRODUCT_INDOBJ_SAVE


Maintain below values under the tab ‘Outbound Options’:

Receiver Port = Choose a port corresponding to destination (in this case port for Q0CCLNT800), which was created in

                            previous step

   
Choose ‘Transfer IDoc Immediately’

Basic Type = CRMXIF_PRODUCT_INDOBJ_SAVE01


WE20-S1.png


WE20-S2.png


In destination system (Q0CCLNT800), there has to be an entry for source system (Q0CCLNT558) under Partner Type LS. And for this Partner Number, add an entry under Inbound Parameters using ‘Create inbound parameter’ button as below:


Message Type = CRMXIF_PRODUCT_INDOBJ_SAVE


Maintain below values under the tab ‘Inbound Options’:

Process code = APLI

Choose ‘Trigger Immediately’

WE20-D1.png


WE20-D2.png


4) Site Creation and Subscription


This has to be done in Source System alone and can be done via transaction SMOEAC.


In Admin Console, choose Object Type: Site, click on Display Objects.Right click on Sites and choose Create.


Provide Name and Description.

Choose Type as ‘External Interface for IDocs’.

Click on Site Attributes and maintain below details:


EDI Partner Number: <RFC-Destination of target system> (Q0CCLNT800)

EDI Partner Type : LS


Using the same transaction, you can create Subscription for Publication: Product Individual Objects via Object Family (MESG) and give criteria value as below:


PRODUCT_INDOBJ_ROOT            OBJECT_FAMILY         EQ        D     0601


Assign the subscription to the site created above.

Replication Object involved here is PRODUCT_INDOBJ.


In Q0CCLNT558:

SMOEAC-1.png

SMOEAC-2.png

SMOEAC-3.png

SMOEAC-4.png


5) Assign Site and BDoc Type to Interface Type


This has to be done only in the source system and using transaction CRMXIF_C1.


In Q0CCLNT558:

IF1.png

Please note that, all the above steps can be found under the below customizing path as well :


SPRO-->IMG-->Customer Relationship Management-->CRM Middleware and Related Components-->Exchanging
Data With External Components-->XIF Adapter Setup-->Outbound Direction (and Inbound Direction)


You can monitor the IDocs using transaction WE05 and view the detailed data using transaction WE19.


In Q0CCLNT558:

Transaction WE05,

WE05-S1.png


In Q0CCLNT800:

Transaction WE05,

WE05-D1.png


With above setup in place, vehicles created in Q0CCLNT558 automatically gets replicated to Q0CCLNT800.

What you need to make sure here is that basic settings like product category etc. exists in both the system,

otherwise object creation in target system would not be successful.


Similar set up can be done for automatic replication of order, BP from one system to another or from one client to another.

You can also use this XIF adapter together with LSMW (Legacy System Migration Workbench), in order to

import the data present in a flat file, to generate the IDocs first and then to save them in CRM system.


Hope you find this blog useful

SAP CRM Middleware Monitoring – Basics

$
0
0


CRM Middleware integrates various data producers both SAP and Non-SAP systems with the SAP CRM landscape.

This document gives you a basic introduction on middleware monitoring on erred BDOCs and reprocessing it to clear the queues. Document restricted in finding the queue names and error segments of the BDOC. Hope this document serves the purpose at some point of time. Thanks and happy reading. Feedbacks are welcome!.


Step1: Start SMW01 with the following settings.


     Choose ‘Errors’ in ‘Bdoc State’.

     On execution, BDOCs with mistakes can be seen.S1.png

Relevant BDOCs for monitoring at a particular customer were the following


BUPA_MAIN                      Contains the master data of a business partner (triggered on creation and change of a business partner)

BUPA_REL                        Used when you create a relationship between two business partners

PRODUCT_MAT                Used for data exchange of products/materials

CRM_EQ_DMBDOC           Used for data exchange of equipments

BUS_TRANS_MSG            For data exchange of transactional data


Step2: Selecting the particular row of the BDOC with error and click on the extensive data button.S2.png


Step3: Extensive error data segments.

           S3.png

Step4: Data error segments further navigate into segments in details.     S4.png


Step5: Number ranges for contact persons are different in CRM and R/3 systems. For customer the business partner number is the           same in both CRM and R/3.


Lookup for Business partner (Customer/Contact Person/Employee)       BP

Lookup for Customer in R/3                                                                 XD03

Lookup for a Contact Person                                                               VAP3


Step6: In order to know who created, for example a business partner in SAP CRM, you can look up this information in table BUT000 via transaction SE16.


Step7: Using transaction SU01/SU01D we can see who the user is.


Step8: Reprocess the BDOC is necessary to further send/receive the data segments.


Cheers,

Vivek Raj Kumar M.


Product Master Data - Settypes/Reltypes In Detail

$
0
0

Data related to a Product (Material, Individual Object, Service, IP, warranty), in CRM Product Master Data can exist either in product Reltypes orinproduct Settypes. Reltypes are nothing but product relations. It is also known as Product Interlinkages.


Settype or a reltype, will be visible in CRM Web UI, as a separate assignment block.


Product Interlinkages (Reltypes):

Product Interlinkages(Reltypes) can be of 2 different types:


  • Product to Product relation


          Example:

               Accessories of a product

               Warranty associated to a product

               Components of structured product

               Service parts of material etc.


  • Product to BP relation


           Example:

               Competitors of a product

               Suppliers of a product

               Involved Parties of an individual object (say Owner of the vehicle, Contact Person of an Individual Object etc)


More reltypes which are delivered in standard, can be found using table COMC_IL_TYPE and COMC_IL_TYPE_T, with Source = BUS1178 (Product) and Destination = BUS1178 (Product) or BUS1006 (Business Partner).Users can also create their own reltype, between Product to Product or Product to BP, using EEWB (Easy Enhancement Workbench).


SAP Note: 1139562  can be referred here to integrate Z* reltype in Web UI

SAP Note: 1418914  explains AET (Application Enhancement Tool) VS EEWB.

SAP Note: 1874824  Usage of EEWB in Product Master Data


Reltype table is COMM_IL_<reltype-id> for SAP delivered reltypes and ZOMM_IL_<reltype-id>, for customer specific reltypes.


Product Settypes:


Product settypes are nothing but group of related product attributes.


Examples for settypes include Unit of Measure (COMM_PR_UNIT), Product Tax (CRMM_PR_TAX), Sales area data (CRMM_PR_SALESA) etc.


Settype CRMM_PR_TAX, groups together tax related attributes like tax country, tax region, tax type, tax group, tax tariff code etc.


Settype COMM_PR_UNIT, groups together Unit of Measure related attributes like Base Unit, Alternate Unit, Numerator, Denominator, Gross Weight, Net Weight etc.


Table COMC_SETTYPE can be referred, to know more about settypes which are delivered in standard.


It is also possible to create our own product attributes and group them together in a new settype, using Transaction COMM_ATTRSET.


Below are the steps involved from settype creation to their availability in CRM Web UI:


StepDescriptionComments
1

Definition of Attributes and Set Types

Transaction COMM_ATTRSET
2

Assignment of the Settypes to the Category

Transaction COMM_HIERARCHY
3

Settype assignment to respective Overview Page

Transaction CRMM_UIU_PROD_GEN
4

Configure Settype as visible Assignment Block in the OVP

Using Configuration Tool in BSP workbench
5a

UI Configuration Creation of the Settype

Transaction CRMM_UIU_PROD_CONFIG
5b

UI Configuration Adaption of the Set Type

Optional (changing field label, field properties etc using configuration tool)
6

Assignment of the Category to the Product

Applications Products, Services, Warranties, Objects, Competitor Products, ...during creation process


Below are the respective Overview Pages for the respective applications:


ApplicationOVP
ProductsPRD01OV/MaterialOV
ServicesPRD02OV/ServiceOV
WarrantiesPRD05OV/WarrantyOV
ObjectsPRDIOOV/ObjectOV
Competitor ProductsPRDCPOV/CompetitorProductOV


Optionally, implementing data check routines for attributes of the set type can be done using BAdI PRODUCT_SET.


SAP Note: 1533208 How-to-guide for creating set types in SAP CRM,  can be referred here.

SAP Note: 1508557 Extensibility VS settype enhancement


Adding custom settype attributes into product search is also possible. SAP Note:1026956 and 1430798 can be referred here.


Different kinds of settypes and their appearance in CRM Web UI:


For demonstration purpose, I have created 2 attributes 'Product Model Number', 'Date of Manufacture' without checking the checkbox 'Multiple Values Pos.' and attribute named 'Instructions' with checking the checkbox 'Multiple Values Pos.' during attribute creation.

In below scenarios, I have used attribute 'Instructions' within settypes as single value attribute field and multivalue attribute field. And for demonstration purpose, I have used PRD01OV as my overview page component.


1) Single line settype (without any multivalue(MV) attributes)


      Settype configuration is present in PRDGENSET/SLSeteOV, with Object Subtype = <Settype-ID>.


       SL1.png


2) Single line settype which is Org Dependent (without any MV attributes)


     Settype configuration is present in PRDGENSET/SLDCSetEF, with Object Subtype = <Settype-ID>


      For Org Dependant settypes, Overview page: PRDDC/DCOV.


       SLDC.png


3) Single line settype with MV attribute


To use an attribute as a multivalue attribute, it is required to tick checkbox 'Multiple Values Pos.', during attribute creation using transaction COMM_ATTRSET. And this attribute can be used as again single value or multivalue attribute within a settype, during settype creation using transaction COMM_ATTRSET,tab 'Assinged Attributes', using check box 'Multiple Values'. Please note that, this check box is available only for attributes for which checkbox 'Multiple Values Pos.' is ticked, during attribute creation.


MVP1.png


mvp3.png


Do not get confused with check box 'Multiple Use' avaibale during settype creation, using transaction COMM_ATTRSET. This indicator is ticked, when this settype can be used by more than one products say general characteristics like Unit of Measure which can be re-used across several products and when unchecked, it means that settype is bound to single product, say serial number.


MVP4.png

Settype configuration is present in PRDGENSET/SLMVAttreOV(for MV attribute) and PRDGENSET/SLSeteOV ( for non-MV attributes) , with   Object Subtype = <Settype-ID>.


      SLMV.png


4) Single line settype with MV attribute which is Org Dependent


Settype configuration is present inPRDGENSET/SLMVDCAttrEL (for MV atttribute) and PRDGENSET/SLDCSetEF( for non-MV attributes), , with Object Subtype = <Settype-ID>.


For Org Dependant settypes, Overview page: PRDDC/DCOV.


      SLMVDC.png


5) Multi line settype


Settype configuration is present in PRDGENSET/MLSeteOV, with Object Subtype = <Settype-ID>.


To qualify for multiline settype, 'Field is Key' should be ticked under 'Assigned Attributes' tab during settype creation in transaction: COMM_ATTRSET, for relevant attributes.


     ML1.png


6) Multi line settype which is Org Dependent


    Settype configuration is present in PRDGENSET/MLDCSetEL, with Object Subtype = <Settype-ID>.


     For Org Dependant settypes, Overview page: PRDDC/DCOV.


MLDC.png


Common mistakes performed due to which assignment block for the settype goes missing in Web UI:


  • Make sure that in Transaction CRMM_UIU_PROD_GEN, you provide the correct Enhancement Set for that client. This can be checked in table  BSPWD_EHSET_ASGN. Also, make sure to provide the right Overview Page Component.
  • Also, make sure that you add the settype AB from Displayed to Available AB, using Configuration Tool, for the correct configuration of that OVP.


        Hope you find this blog useful

Display the change history of an account (BP) more quickly

$
0
0

Many users from sales, service or marketing need to check here and there the change history of an account:


  • You could get a call from a customer and need to check when the data it is talked about actually came into the system.
  • You want to see when the last update of marketing attributes took place.


But what if you wait minutes until the change history is displayed? Or what if you miss some changes?


Consider the following improvements then:


Display of marketing attribute changes in the change history of an account (SAP Note 1970970):

With implementing this SAP Note you also see the changes of marketing attributes in the change history assignment block in the account and contact overview pages. Without this improvement you need to run a report separately for seeing the changes of marketing attributes.


Display of change history with increased performance (SAP Note 623177, SAP Note 1972182):

With implementing these SAP Notes you can reduce the waiting time until you can actually see the change history in the account and contact overview pages.

The SAP Note 623177 is absolutely required to reach the main performance increase. The SAP Note 1972182  can result in further performance improvements, especially in case you use the included feature to display the change history of a specific period of time, for example the change history since the last year. With that users can look much quicker for the changes they are interested in. Often they anyway have a typical period of time they need to look at. With the SAP Note 1972182 implemented they need to select only once this period of time. This selection is kept so that the user never needs to select it again but automatically get the change history of this period of time when opening the change history assignment block.


Please note:

Some companies appreciate the "Display of change history with increased performance", but have so many changes of marketing attributes that they prefer to not use the "Display of marketing attribute changes in the change history of an account". At some point of time - with the right SP - both functions are automatically in the CRM system. So what to do? - In this case you can apply the SAP Note 2066671. With this you switch-off the display of marketing attributes in the change history again.


These SAP Notes are available for CRM 7.0 EHP1, EHP2 and EHP3.

Condition Master Data - Customizing Download

$
0
0

In this blog, I would like to touch upon customizing object used to download customizing setup from ECC to CRM, related to Condition Master Data. I would also like to mention, most commonly faced issues/errors/mistakes during customizing download from ECC to CRM.


This may not include complete list of errors that may occur during customizing download of Condition Master !!! Also, solution might vary from one business scenario to another. So, please evaluate the situation before applying the solution mentioned here, which is mainly based upon my experience in this area.Also, some of SAP Notes mentioned here may look old but still they are of much relevance.


All objects (Customizing or Master Data), related to condition master, can be found using transaction R3AC5, in CRM.

Object DNL_CUST_CNDALL, can be used to download all the customizing related to condition master data from ECC to CRM, irrespective of usages like PR (Pricing), LI (Listings), PD (Product Determination), FG (Free Goods) etc. You can also find usage specific customizing object in this transaction. But, it is recommended to download total customizing, using object DNL_CUST_CNDALL. This object is responsible for downloading condition table structures, access sequences, condition types, pricing procedures etc. from ECC to CRM.


Please note that standard customizing object DNL_CUST_CNDALL, is responsible for downloading customizing data from ECC to CRM, from both client specific and client independent tables. Do not get confused this, with object DNL_CUST_CND, which downloads data from only client specific tables, from ECC to CRM. Tables which are client independent are delivered as 'Inactive' in this object DNL_CUST_CND. Also, do not try to download object DNL_CUST_CND, by changing inactive objects to active, which might generate inconsistencies!!!


To know which tables are cross-client and which is client specific, then SAP Note: 484073 - Customizing download of cross-client tables, can be referred.


After performing a customizing download of object DNL_CUST_CNDALL, you can refer transaction SLG1 with below details, to check for any possible errors occured during customizing download in CRM:


Object: COND_EXCHANGE

Subobject: CUSTOMIZING

From/To (Date/Time): <Date Range - Start of Download till Download Completed>


If you face any issues or discrepancies in condition master customzing in CRM, even after performing download of condition customizing object, logs are the first place to be checked, as described above.


SAP Note: 314542 - Messages in application log of condition exchange, can be referred here for some of possible errors.


Below are few important points/scenarios, to keep in mind/refer, with respect condition master data customizing or download from ECC to CRM:


  • Never change any settings in standard delivered customizing object, which might cause inconsistencies.

         Refer, SAP Note: 696564 - Initial deletion of condition customizing table’s doesn't work.


  • It is required to open the client for cross-client customizing, during download of customizing object DNL_CUST_CNDALL, to complete successfully.

         SAP Note: 969087 - Downloading cross-client Customizing objects, can be referred here.


  • It is always recommended to create a separate download object for each A table (or a condition table of any usage). So one download object per table. Also, make sure that a table is associated to only one download object.


  • Manual execution of report /SAPCND/RV12N001 is not needed afterperforming a customizing download from CRM 4.0 onwards. This report would berun automatically, during the customizing download. This reportcan be used to generate/delete a condition table in case of any inconsistency.

         SAP Note: 398078 - Customizing download and report /SAPCND/RV12N001,

         647151 - Report /SAPCND/RV12N001: Generation of condition tables, can be referred here.


  • There is no delta download for customizing changes, from R/3. For any customizing changes done in R/3, it is required to trigger an initial load of customizing object DNL_CUST_CNDALL, to sync the changes to CRM.


  • You want to define a condition table having standard field VKBUR (Sales Office) as one of its key field. Since there is no standard mapping for this field, table generation will not be successful.

         SAP Note: 674538 - Copying conditions for sales office VKBUR into CRM,

         can be referred here to know the additional steps required.


  • You want to create a new table in R/3 with a standard field, which is not supported in CRM or with a new Z* field and then want to download this table to CRM using customizing download.

         SAP Note: 514952 - Download of customer-specific tables,

         335202 - Product hierarchy and condition interchange,

         1070997 - Condition download:Parameter BAdI CND_MAP_CNV_FIELD, can be referred.


  • Also, make sure to generate the field catalogue using Transaction: /SAPCND/CTFC, after adding the fields and also make sure that Internal working set structure /1CN/WORKING_SET_I_D_CRM contains newly added fields. Any possible error messages during field catalogue generation, can be seen using transaction SLG1 with Object = COND_TECHNIQUE and Sub object = FIELD_CATALOGUE.
  • Also, note that CRM communication structure CND_MAPT_ACS_REM_CUST, has enhancement category as 'Can be enhanced(character-like)'. This means that only C,N,D and T data types are supported for newly added fields. Data types like QUAN or CURR etc. are not supported.


  • Customer specific condition table was already downloaded to CRM earlier. But now, you have further enhanced the table in R/3 say adding/removing a new/existing field etc. And you are trying to bring down the modified version of table to CRM using customizing download. But table generation fails in CRM saying ‘Process BDocs first’.

       SAP Note: 423096 - Field catalog condition technique;incorrect messaging BDocs, can be referred.


  • Also note that, while generating the field catalogue, there is a check on table T000 to check if the current system is Demo (D) or Live (P). If the current system is not either D or P, then the generation check is not done. But if current system is D or P, then generation check is done to check if there are any unprocessed BDocs and raises errors when found. This check happens via BAdI: /SAPCND/GENERATOR.


  • If you are using a constant within an access sequence and if you observe some unexpected pricing result in CRM, then refer

         SAP Note: 726798 - Problems with constants in access seq. (/SAPCND/T682Z-QUDIW).


  • You want to have your own logic defined for field conversion from R/3 to CRM. Refer,

         SAP Note: 534350 - Implementing BADI for Fields used during condition exchange.


  • You want to use standard R/3 field KUNAG, within a condition table but field mapping do not exist in CRM and R/3 field KUNNR has been already mapped to sold-to-party field in CRM.

        SAP Note: 501567- Transferring conditions for sold-to party KUNAG to CRM, can be referred here.


  • You want to use standard R/3 field MATKL, within a condition table but field mapping do not exist in CRM.

         SAP Note: 441083 - Transferring conditions for material group MATKL to CRM, can be referred here.


  • If you are planning to do an upgrade or post-upgrade if you face any issues, then

        SAP Note: 683678 - System setting does not allow changes to Z objects,

        SAP Note: 1081025- Additional info for XPRA CND_XPRA_COND_OBJ_UPDATE can be referred.


  • Costs (R/3 condition type VPRS) are not supported in the CRM order.

        SAP Note: 653046- Costs in CRM-pricing vs. R/3, can be referred to find a work around solution.

Below are some of the scenarios/issues you may face, during condition customizing download, with possible solutions:


ScenarioMessage DescriptionMessage Id/No:Possible Solution

You are trying to add a new condition table in CRM, for a combination of Application, Usage,

Condition Type XXXX,(Account Type, Product Level) using customizing in transaction SPRO.

There are tables for condition type XXXX but they cannot be maintained./SAPCND/MAINTENANCE027

Check table MNTCNT in R/3 and make sure that table maintenance is in CRM for that Application, Usage, Condition Type.

For any customizing changes in R/3, make sure you re-download object DNL_CUST_CNDALL.

A particular condition type XXXX, is not visible under Conditions tab of transaction COMMPR01 or under Prices assignment block, in CRM Web UI.

Maintain condition type XXXX under maintenance group = PRODUCTCRM using below customizing path:

SPRO --> IMG --> CRM-->  Master Data -->  Conditions and Condition Technique -->   Condition Technique Basics -->Create Maintenance Group

Also, note that condition table should contain product field so that you can view it in transaction COMMPR01, provided valid condition record exist.

Customizing download is not successful.

Condition table, Access sequence or anything

related to customizing changes have not been

downloaded to CRM, even after downloading

customizing object DNL_CUST_CNDALL.

It is not possible to change client-independent Customizing Objects.

In order to download customizing object DNL_CUST_CNDALL, client should be open for customizing changes. This can be done using transaction SCC4. Choose 'Changes allowed to Repository and Cross-client Customizing'.

Refer SAP Note: 969087 - Downloading cross-client Customizing objects.

When trying to activate a condition table manually using report /SAPCND/RV12N001 or even after performing a customizing download, table is not activated in CRM for condition table containing standard field VKBUR (Sales Office) as a key field.

Refer SAP Note: 674538  Copying conditions for sales office VKBUR into CRM.
There are error messages in transaction SLG1,after performing a customizing download of object DNL_CUST_CNDALL, saying:

Error converting field FIELD_TIMESTAMP into /SAPCND/T685 for condition type XXXX.

Double entry for table PRCC_COND_CT.

CND_MAP181

CND_MAP812

Refer SAP Note: 314588 - Errors during correction of /SAPCND/T685-FIELD_TIMESTAMP.
One possible scenario for this error could be, say for Condition Type XXXX, table /SAPCND/T685 has field DATA_ORIGIN as 'A' which is correct for integrated scenario.
But for this Condition Type XXXX, table /SAPCND/T685T and PRCC_COND_CT
has DATA_ORIGIN as 'B', which is not correct.
To correct this you can  write a small report to change the DATA_ORIGIN field from table PRCC_COND_CT and /SAPCND/T685T to 'A' so that download process will update the condition type successfully.
Please find the sample code below in order to modify the table entry of PRCC_COND_CT for Condition Type XXXX.


DATA: wa_cond type PRCC_COND_CT,

* To modify PRCC_COND_CT table
select single * from PRCC_COND_CT into wa_cond where kappl = 'CRM' and kschl = 'XXXX'.
if sy-subrc = 0 and wa_cond-data_origin = 'B'.
wa_cond-data_origin = 'A'.
update PRCC_COND_CT from wa_cond.
endif.


You need to perform the same operation for table /SAPCND/T685T as well for Condition Type XXXX using a Z* report.


Once this is done, please perform the download of object DNL_CUST_PRC
and make sure that Access Date gets replicated correctly now.

In customizing you observe that, access field within a particular access for an access sequence, is not mapped to IPC communication structure CRMT_ACS_H_SEL. Hence Source Structure, Source Field is displayed as blank.

Make sure that field mapping for that access field, exists in CRM.

Also, ensure that R/3 table T682Z has correct value for field ZIFNA/QUFNA, for which field mapping exists in CRM.

(table CND_MAPC_CNV_FLM or CND_MAPM_CNV_FLM)

You have many accesses within access sequence with Access Type = A.

During customizing download you observe this message in logs, saying:

The Access Type A is not Available.SAP Note:1600482 - Hierarchical access functionality, can be referred here.
Error message in logs saying:Field XXXXXX of table is not referenced in access CRM PR XYZ.

Table would be one of the access within access sequence XYZ in R/3.

Now XXXXXX would be key field in this table but missing in these access sequences, as access field.

Customizing download stops with error message in logs saying:"The access type A is not available (access seq. ..., access ..., field ..."CND_MAP 209

SAP Note: 1697350 - Customizing downloads stops due to access type 'A'  OR

SAP Note:  1674760 - Analysis of access sequences using access type A, can be referred  here.

You want to influence the behaviour of customizing download or want to have customer specific logic in CRM, to be applied during customizing download.

Check BAdI: CND_MAP_CORR_CUST

Even after performing customizing download, CRM table /SAPCND/T681M is empty.

Check the LOGSYS value maintained in R/3 table MNTCNT and compare it with CRM table T00.


If you face any such issues mentioned earlier, while performing condition customizing download, then its always better to apply the proposed solution, first in Test/Development/Quality system before applying the changes to productive client.


In my next blog, I will try to touch upon Condition Master Data download and upload as well.


Hope you find this blog useful

Your suggestions, feedback, comments on this blog are most welcome.

Condition Master Data Download

$
0
0

This is a continuation of my previous blog: Condition Master Data - Customizing Download.

In this blog, I would like to discuss about condition master data download, which is performed in order to bring down the condition records from ECC to CRM.


Once you confirm that condition customizing object DNL_CUST_CNDALL has been downloaded to CRM successfully, you can proceed with bringing down the contents from condition master tables from ECC, by performing an initial load of condition master data objects.


As mentioned in my previous blog, condition master data objects can be viewed using transaction R3AC5 in CRM.

Example for condition master data objects (standard):

Object DNL_COND_A065 - To bring down pricing records from ECC table A065 to CRM

Object DNL_COND_G001 - To bring down listing records from ECC table KOTG001 to CRM

Object DNL_COND_D001 - To bring down material determination records from ECC table KOTD001 to CRM


Once the download is performed, its always better to check the logs in transaction SLG1 of CRM, to view errors occured during the download, as below:


Object: COND_EXCHANGE

Subobject: CONDITIONS

From/To (Date/Time): <Date Range - Start of Download till Download Completed>


You may not be able to view the errors occured during condition master download, using transaction SMW01 for BDoc type: CND_M_SUP. Hence, its always recommended to check the logs to confirm the status of the download.


Below are some of  important points/scenarios, to keep in mind/refer, with respect condition master data download from ECC to CRM:


  • Do no change anything in SAP standard delivered condition objects. Rather, you can copy a standard object to a new Z* object and fulfill your requirement.


  • Before loading the master data using Z* condition object, in case of customer specific condition table, make sure that table is active. This can be checked using table /SAPCND/T681 in CRM, value of field GESTA should be 5 for that KOTABNR. If not, you can try to activate the table using below customizing path:

          SPRO-->IMG-->CRM-->Basic Functions-->Pricing-->Define settings for Pricing-->Create condition tables

         Condition Table : CUSXXX

         Click on Activate Condition Table.


Sometimes it may happen that in transaction SE11 table would be active but in above customizing it would still display as Inactive.


  • If you suspect or observe any kind of data inconsistency in any of condition tables, then you can refer SAP Note: 664815 - Check of data inconsistency in condition tables, in order to check/delete the inconsistencies.


  • You observe that not all condition records have been downloaded to CRM, even after performing an initial load of respective download object. It is important to note here that, performing download of master data like Products, Business Partnersand Sales Organization is necessary, before performing a download of condition object.

          SAP Note: 877842 - Initial Download does not download all the records to CRM, can be referred here.


  • You define customer specific condition object in transaction R3AC5, to download customer specific condition table. But during regenerating the filters, you get below message: 'Function module /1CRMGC/CND_M_SUP_FIL does not exist'.        
    SAP Note: 1826448 - Change in Authorization Check of  RS_FUNCTIONMODULE_INSERT, can be referred here.


  • To maintain a table in CRM, which was originally created/maintained in R/3, you need to make an entry in R/3 table MNTCNT for this table and then perform a customizing download. In order to maintain a table in CRM, this table should have entry in CRM table /SAPCND/T681M and in CRM table /SAPCND/T681 field DATA_ORIGIN should be ‘B’. If this field value is ‘A’ and if there is no entry in CRM table /SAPCND/T681M,then it means, that particular table can be maintained in R/3.


  • For Usage = Listings, it is always recommended not to perform an initial download from R/3 to CRM multiple times which might cause performance issues. Rather, initial load should be carried once and then maintenance has to be shifted from R/3 to CRM.

         SAP Note: 1591754 - Listings download from ECC to CRM, can be referred here.


  • For performance issues, SAP Note: 1483757 - Slow processing tRFC, qRFC in a high load environment, can be referred.


  • SD_COND is the archiving object in ECC and CND_RECORD is the archiving object in CRM, for condition records.


Below are some of the scenarios/issues you may face, during condition master data download/DIMa, with possible solutions:


This may not include complete list of errors that may occur during condition master data download !!! Also, solution might vary from one business scenario to another. So, please evaluate the situation before applying the solution mentioned here, which is mainly based upon my experience in this area.Also, some of SAP Notes mentioned here may look old but still they are of much relevance.


ScenarioMessage DescriptionMessage Id/No:Possible Solution
Delta download of a condition record fails.

1) Make sure RFC connections are working fine. This can be tested using transaction SM59.

2)Depending on the Usage, make sure below entry corresponding to usage exist in R/3 table TBE31.

00503301        BC-MID   CRS_PRICES_COLLECT_DATA (Usage = A, Pricing)

00503302        BC-MID   CRS_LISTING_COLLECT_DATA (Usage = G, Listing & Exclusion)

00503309        BC-MID   CRS_FREEGOODS_COLLECT_DATA (Usage = N,Free goods)

00503310        BC-MID   CRS_AGREEMENTS_COLLECT_DATA (Usage = E,Rebates)

00503311        BC-MID   CRS_PRD_DET_COLLECT_DATA  (Usage = D,Mat. Determination) etc.

3) Make sure, R/3 table CRMRFCPAR has an entry like below for your  CRM RFC destination.

Consumer = CRM

ObjectName = CONDITIONS (*)

DOWNLOD = * (All load types) or D (Delta Load)

DISCARDDAT =  '  '

4) Make sure that R/3 table CRMPAROLTP, do not have an entry for:

PARNAME = CND_DELTA_SEND_AS_REQUEST

5) In CRM, check transaction CND_MAP_LOG_DISPLAY for Object = COND_EXCHANGE

Subobject = CONDITIONS for correct From/To dates.

This might give you some clues for possible errors.

6) Try to debug from R/3 by enabling System/Update debugging during condition record creation. FM: CRS_SEND_TO_SERVER

Unable to download condition object from R/3.Previous downloads were not completely finished: Termination.CND_MAP351

Delete the entry in table CND_MAPC_INF_DNL, if there exists already an

entry for the current object. This happens when previous load was aborted and CRM I/B and R/3 O/B queues were deleted manually.

Also note that, table CND_MAPC_INF_DNL is not client dependent.

During initial load of condition master data, records are not deleted properly and sometimes duplicate condition records get created. Or you observe some kind of data inconsistency between condition table, supplementary table and scale tables.

Refer SAP Note: 664815 - Check of data inconsistency in condition tables. Only when inconsistencies are removed, initial or delta load works correctly for that condition table.

Trying to change an existing condition record in R/3 using transaction VK12. But in CRM, update fails with error message in log saying:

Error when reading scale table *VO1 for application CRM and usage PR.

Errors when deleting data records for VARKEY

Error converting scale levels; KNUMH

SAP Note: 664815 should be followed to check and remove the data inconsistency.

This type of inconsistency happens when scale data is missing in table CNLCRMPRSCALEV01 but present in other scale tables like CNLCRMPRSCALEDIM

CNLCRMPRSCALEDEF

CNLCRMPRSCALEEVL etc.

Perform a request  for a particular KNUMH and make sure that scale data exists in all 4 tables related to scale.

Even after request load, entry is missing in scale table CNLCRMPRSCALEV01 but present in other scale tables, then it happens due to incorrect data maintenance in R/3.

One such scenario which I have come across is not maintaining field 'Scale Currency' in R/3 table KONP.

Request/Initial/Delta load do not bring down condition record to CRM.

Field content <BP-ID> from field KUNNR could not be converted.

Field content <ORG> from field VKORG could not be converted.

Field content <MATNR> from field MATNR could not be converted.

Message no. CND_MAP325

Error in conversion of field contents, KNUMH yyyyyy not converted

Message no. CND_MAP303

CND_MAP325

CND_MAP303

Make sure that master data like materials, BPs, Sales Org have been downloaded before trying to bring down the condition records for them.

SAP Note:877842 - Initial Download does not download all the records to CRM.


Sometimes it may happen that, when you are trying to create a material/article in R/3 followed by maintaining a condition record for that material/article. But in CRM, since these 2 are sent 2 different queues, it may happen that condition queue gets processed before material queue and hence resulting in an error message in logs.

This can be influenced using SAP Note:658272 - Condition download occurs before Article download.

You have defined a request load based on KNUMH to download some condition records. But request load brings down no data to CRM.

Bdoc CND_M_SUP is empty.

Make sure that KNUMH is complete during request definition. Meaning leading zeros for KNUMH should not be omitted.

Also, filtering is possible only on table key fields apart from KNUMH.

SAP Note: 454010 - Plug in development for request download extractors, can be referred here.

You create a DIMa instance to compare data between R/3 and CRM, for a customer specific condition table. But this results in queue failure.

SYSFAIL in CRM outbound queue  (R3AT_<DIMa_Instance>) saying

'DIMa instance could not be started'.

In trasnaction SDIMA_BASIC, make sure that DIMa object points to correct object name,

which should be present in transaction R3AC5. If not, correct the object name as per entry present in R3AC5 for that condition table.

Request download deletes condition records which were Inserted from the previous block with the same key fields but different Timestamps.

Change the Blocksize for condition object in R3AC5, so that blocksize value is higher than number of records for a VAKEY combination. This would avoid, condition records having same VAKEY combination falling across 2 different blocks, resulting in deletion of condition records having same VAKEY, which were inserted during previous block.

Error message in logs saying:

Deletion not possible./1CN/CCBCUSXXX is still in use in access

sequences.

Object CNCCRMPRCUSXXX or CNCCRMPRCUSYYY is still referenced to

object [CRM, PR, ZZZZ].

CND_MAP2  52

CND_MAP2  56

This type of error comes generally when table is getting deleted but unable to delete since table is still used by some access sequence. Hence before trying to delete the table, de-associate the mentioned table from access sequence and then try to delete the table.
Following steps can be followed:
- Delete the condition tables from access sequence ZZZZ.
- Now you can run report /SAPCND/RV12N001 for the relevant table,
for example CNCCRMPRCUSXXX with following data:

Application     CRM
Usage            PR
Table Number CUSXXX

Selection of objects to be deleted --> Flag all the checkboxes.

- Once the condition table has been deleted, you can download the new pricing customizing.

Error message in logs saying:There is no entry in the object directory (TADIR) for R3TR.....

The message could be raising because of the incorrect filter settings.

You should not delete the standard filter settings. Deletion of standard filter settings could lead to these kind of warning and error messages.

Make sure that all the standard filters are maintained in your adapter object in CRM.

During listing download, you observe this message in logs saying:

'No PPR type could be determined for appl. CRM and condition table SAPXXX'.

Split of VAKEY fields failed (Block 1; Appl. LI; Use CRM)

Below customizing needs to be checked:

SPRO --> IMG-->CRM --> Master data --> Listing --> Settings for Listings -->

Partner/Product Range settings for Listing Items and Assortments- ->

Define Partner/Product Range Types for Listings and Assortments and also check Define Access to Partner/Product Range

Maintaining the correct customizing should solve the issue.

You are trying to run DIMa instance in CRM using transaction SDIMA.Values for field KWAEH in additional table differ.

Check SAP Note: 1351981 - SDIMa issue with compare of condition data.
1540717 - KWAEH Field error when comparing condition data using DIMA.
1659290 - Condition data DIMA errors for fields KWAEH and SUPP_EXIST.
1826986 - DIMA error for SUPP_EXIST field.

1927543 - DIMA errors with MXKBAS and SUPP_EXIST fields

exists in your system. If not, then try to implement them.

Initial download of condition object DNL_COND_A011  fails.

'There may be dump in ST22 saying,

Error in mass insert in table CNCCRMPRSAP011.

SAP Note: 720114 - Initial download of condition object DNL_COND_A011 fails can be referred here.

Error message in logs saying:'Filter option set for field xxxxxx, table yyyyy in object  XYZ is not supported'

You need to check the filter settings for condition object in transation R3AC5.

Operator 'BT' (between) is not supported. It is recommended to use as evident from the long text of the message, only option 'Equal' and sign 'Inclusive' .

Not all records from condition table gets downloaded from R/3 to CRM.

Check the filter settings in transaction R3AC5 for that condition object.

Also, make sure that in R3AC5,  under the tab 'Mapping Modules:R/3 to CRM',

mapping module has been registered only once. Sometimes, double entry of this module exists, resulting in abnormal behaviour.

You have queries related to authorization concept for displaying/editing condition records.

SAP Note: 1853382 - Level of authorization checks cannot be maintained in downloaded pricing procedures,

SAP Note: 1166349 - Authorization check as of AP 7.00 , can be referred.

You are unable to archive the condition records for table, which is

maintained in CRM.

This is the standard behaviour. In CRM, condition records can be archived for table which are maintained in CRM. For R/3 maintained condition records, archiving should be performed in R/3 and should trigger an initial download to sync the data with CRM.

This check is performed using BAdI: /SAPCND/MNT_CHECK

You observe that some of the condition records are missing in CRM.You can perform a request load from CRM, for missing KNUMHs.
Condition records are not flowing into CDB or R/3.

Please make sure that you have not stopped the Bdoc flow in the following customizing:

SPRO-->IMG-->CRM-->CRM Middlware and Related Components-->Message Flow Setup

-->Bdoc Type Customizing. Make sure that for Bdoc Type 'CND_M_SUP', 'Do Not Send' is unchecked.

During condition master data download, SYSFAIL in CRM I/B queue saying:

"Message number 999999. Log is full"

"Message number 999999 is reached"

Sometimes, it may happen that there are too many logs
already in the system and might reach an overflow point wherein the application log cannot hold any more messages.

  1. Check table CND_MAPC_INF_DNL for OBJNAME = DNL_COND_AXXX or ZNL_COND_AXXX.
    Take a note of the REF_ID.
  2. Go to transaction SLG2. Under 'Expiry date' block, select
    option ‘Only logs which can be deleted before the expiry date'.

Under 'Selection Conditions' block, specify the following:

Object = COND_EXCHANGE, Sub object = CONDITIONS, External ID = REF_ID copied from step 1.Under 'Options' block, select 'Create List' and Execute.


A log will be displayed, which you can select and then
delete it.


Please note that table CND_MAPC_INF_DNL is filled only
temporarily with data during the exchange.

You can skip entering value in field External ID, in case no
entries exist in table CND_MAPC_INF_DNL.


SAP Note: 195157 - Application log: Deletion of logs, can be referred here.


If you face any such issues mentioned earlier, while performing condition master data download, then its always better to apply the proposed solution, first in Test/Development/Quality system before applying the changes to productive client.


In my next blog, I will try to touch upon Condition Master Data upload.


Hope you find this blog useful

Your suggestions, feedback, comments on this blog are most welcome.

Debugging CRM Middleware without disabling Queue.

$
0
0

One way to debug CRM Middleware is by disabling the inbound queue in ECC or outbound queue in CRM. This was causing great inconvenience to others working on the same server trying to create similar documents in ECC. This blog is about debugging the CRM middleware without disabling the queue. The example used here is of a DMR request created in ECC once a service confirmation is saved and completed in CRM.


  • Place an external break point in function module CRM_R3_SERVICECONF_UPLOAD.


Image3.jpg


  • Create a service confirmation in CRM, fill the mandatory fields, complete and save the confirmation.


  • By default gv_synchronous_call  is initial and function ‘BAPI_SERVICECONF_PROXY_UPLOAD’ is called as a background task. Once GV_SYNCHRONOUS_CALL is set to ‘X’, function ‘BAPI_SERVICECONF_PROXY_UPLOAD’ is called in foreground task and can be debugged all the way in ECC.

Image2.jpg


  • Function module CRS_SERVICE_BILLING_PROCESS processes the service confirmations.


   Image1.jpg


Stop BDOCs per User

$
0
0
ComponentSupport Package
BBPCRMSAPKU70204
SAP_ABAPSAPKA73105
SAP_BASISSAPKB73105
WEBCUIFSAPK-73105INWEBCUIF
SAP_BWSAPKW73105


Scenario


Inegration between CRM + PI + SUP + Mobile device, all the integration between CRM and SUP is performed thanks to the SAP CRM Middleware + XIF interfaces( Convert BDoc to Idoc) + PI (Conversion of Idoc to JSON).


The Problem


Mass creation of BPs and Condition each month (until we shut down all the legacy systems...), as we are using the XIF interfaces to replicate the changes from CRM to SUP, when we datatransfer using SXDA+LSMW+XIF from the flat files, the system automatic triggers an BDOC-IDoc to PI, the PI guys can hanlde this volume of data (don't ask me why ) so we need to stop the middleware during the data transfer, but, if we stop the middleware we also stop the data syncronization between the Mobile device and CRM, "ok guys, everybody home, we need to do some mass datatransfer".  As I'm not an integration consultant and I don't have time to invest in EDI research I needed to come up with a solution to avoid this behaviour. Stop middleware only for the mass datatransfer but keep it runing for the manual changes done via Webclient or Mobile device.


Approaches


You can stop the replication object using the transaction SMW3_00 - BDoc Type Settings, but as I mentioned, this would stop the whole replication plus you need to generate a transpor request to deactivate it and another transport request to activate it's a pain , but the worse is: no one can work because the changes won't be replicated, I found 2 possible workarounds to this:


Approach 1: Using the BADI IDOC_CREATION_CHECK


Pros:

- Standard BADI

- I can filter per IDOC type

Cons:

- The middleware and XIF impacts on the perfromance of the datatransfer


Approach 2: Create a Implicit enhancement spot a the Class CL_SMW_FLOW Method __CHECK_IF_TO_SEND


Pros:

- No performance Impact during the datatransfer, no middleware/XIF is performed.

- You can filter per BDoc type

Cons:

- Create a custom Implicit Enhancement Spot


Solution


I implemented the approach 2 , because having the middleware activated penalize my datatransfer process.


Custom Table and view (transportable content)


tabledef.JPG


I choosed customizing table, because I want to fully buffer the table to impact less possible to the standard middleware send process.


table.JPG


As content is transportable I may need the replication only stop in a particular system and keep it running in the others for develoment/test propose (as you can imagine my user won't create data in production )


tabletech.JPG


As I already mentioned the impact on the standard should be less as possible.


I also creadted a maintenace view+maintenance program, no secrets here, so I will skip this part, the result maintaned via SM30 looks like this:


viewmaintenance.JPG


Pretty similar to SMW3_00 - BDoc Type Settings, uh?


Custom enhancement spot on class/method CL_SMW_FLOW->__CHECK_IF_TO_SEND.


source.JPG


Conclusion


I followed the customizing table approach isntad of using user parameters, because the interface XIF for conditions will trigger the standard( enhanced ) class meant to control the middleware flow on commit so the user parameter is not determined vai GET PARAMETER ID statement.


Don't forget this is my workaround and is done because I don't have expertise in EDI and PI, I'm sure will be a better and standard solutions, would be cool if someone share them in the comments, feel free to give your opinion!


Cheers!


Luis

XIF, Don't update my CRMD_ORDERADM_H please

$
0
0
ComponentSupport Package
BBPCRMSAPKU70204
SAP_ABAPSAPKA73105
SAP_BASISSAPKB73105
WEBCUIFSAPK-73105INWEBCUIF

SAP_BW

SAPKW73105


Hi,


Recently I was massively uploading the date profile of Sales Orders via SXDA, LSMW and XIF interfaces (CRMXIF_ORDER_SAVE_U06), basically I needed the segment E101CRMXIF_BUSTRANS using the following fields in order to select the Sales Orders which must be updated OBJECT_ID, PROCESS_TYPE and OBJECT_TYPE. Why don you used the GUID instead? well the standard selects the data using the criteria which I descrived, if you only use the GUID will prompt an error, so at the very end you don't need to use the GUID because the standard don't use it.

Going back to the topic, I also needed the segments: E101CRMXIF_APPOINTMENT_XT, E101CRMXIF_APPOINTMENT and E101CRMXIF_APPOINTMENT_F in order to update the date profile of the sales orders, so far so good.


What happend? I uploaded the Sales Orders modifying the date profile, but also the POSTING_DATE (CRMD_ORDERADM_H-POSTING_DATE)


surprise.jpg


WHY?! I didn't map the field using the flag segement E101CRMXIF_BUSTRANS_F, well after raising an incident to SAP...tic tac tic tac


wait.jpg


The SAP consultant pointed to:


If the segment E101CRMXIF_BUSTRANS_F is completely empty then all fields will be updated - this is special for this segment. Mostly you set an X for each field which should be updated. POSTING_DATE or DESCRIPTION are one of the crmd_orderadm_h fields that are put to the input fields by default


In my scenario I didn't need to update any CRMD_ORDERADM_H field so I marked the field  E101CRMXIF_BUSTRANS_F-OBJECT_GUID and everything worked fine. I hope I can save you some time if you have the same issue. The SAP consultnat said he was planing to create a KBA in order to clarify this so is in his to-do list, and we all know this can be writen today, tomorrow or in one year, all depends on his internal priorities, but meanwhile, you can refer here


Cheers!


Luis

Determine the associated CRM table of the Adapter Objects

$
0
0

I have been working in SAP CRM WebUI, ABAP-CRM and Middleware.  I have been searching for the CRM tables which are relevant to the Adapter Objects; I haven’t seen any relevant information in any blogs/Papers on this topic. After 2 hours of debugging I got the below information. I am contributing my first blog, hope it will be useful to the community


Display object using R3AC1/R3AC3/R3AC5.


In this case we are looking at customizing for Account Group Business Partner: DNL_CUST_ACGRBP.

1.jpg

In the Table/Structures tab can view the associated R/3 tables which will be transferred during download process. That will be much better if we can see this table information in the SMOFTABLES.

2.jpg

Chek the same tables in ECC side in SE11/SE16.

   R/3 account group  :       'TVKT'.

3.jpg

   R/3 account group  text :       'TVKTT'.

4.jpg


In order to determine relevant table in CRM side, need to review code contained within mapping module of the download object. In tab Mapping Module R/3 to CRM select the associated module name

  1. e.g : CRMC_OUTPUT_ACGRBP_MAP_SAVE

5.jpg


As Highlighted, We can see the mapping between ECC and CRM tables.

                     Table in  R3

             Table in CRM

                      TVKT

        CRMC_ACGRBP

                      TVKTT

        CRMC_ACGRBP_T

Table in the CRM :

CRMC_ACGRBP :  Account Assignment Groups for Business Partner

6.jpg

CRMC_ACGRPBP_T : Business Partner Account Assignment Group

7.jpg


Same process can be followed for all Objects in order to identify mapping between R/3 and CRM table.

Why " Parent not O.K " ?

$
0
0

Adapter Object Parent :


   The parent object of the adapter object, is a mandatory condition that we need to follow. Normally when we are moving the relevant data from the R3 to CRM or CRM to R3, we will just directly do the normal load of Adapter Object (Initial Load). Some times to make the system conveyance /business scenarios make us to move the data with the relevant filtering. if systems are configured well, objects moves softly and most probably we will get only BDoc error issues, other than this no great issues will not come.


For Example , we can see the adapter Object MATERIAL and its parent object tab.


Parent Objects :


Object Name  :MATERIAL


Parent Object s:  DNL_CUST_PROD0

  DNL_CUST_PROD1

a_1.jpg


We can see list of the Parent Adapter Objects in table SMOFOBJPAR.


  But when we are running the load which is having the parent object, we need to check first all respective adapter object moved. If the parent adapter object not moved properly, then we will get the error as below.


Parent not O.K.: (Here we will get the parent object which is not moved properly)


Eg : Parent not O.K.:Customer_main

        Parent not O.K.:MATERIAL.


For this issue, we need to run the Parent Objects first. Sometimes we have to skip the parent adapter object to align with the business scenarios. In this case we need to remove the parent adapter objects accordingly.


  Now take an example for the CUST_MAT_INFO, which is the Customer Material Information Record move from ECC to CRM. Check the SMOFOBJPAR table with the CUST_MAT_INFO. You can see the Parent details.


a_2.jpg


a_3.jpg


Now try to download the CUST_MAT_INFO object.


In your case BP is moving from CRM to ECC,then customer_main will be replaced else BUPA_MAIN has to moved. So If your case considering ECC to CRM,then no need to run the below program.


  This program just delete and modifies the table SOMFOBJPAR  and program is not big deal too.


*****************************************************************************

*** This Report replaces the Parent object BUPA_MAIN by CUSTOMER_MAIN***

REPORT Z_MW_SMOFOBJPAR.

Data: ls_smofobjpar type smofobjpar.


* Filling the work area to update the table

ls_smofobjpar-objname = 'CUST_MAT_INFO'.

ls_smofobjpar-parentobj = 'CUSTOMER_MAIN'.


* Removing the parent object from the table

delete from smofobjpar where parentobj = 'BUPA_MAIN'.


modify smofobjpar from ls_smofobjpar.


IF sy-subrc = 0.

WRITE : 'Done'.

ENDIF.


*****************************************************************************

Even though you are getting the issue with another object parent not ok,then remove that also. Make sure your business scenarios satisfies first.


*****************************************************************************

*** This report removes CUSTOMER_MAIN***

REPORT Z_MW_SMOFOBJPAR_cust.


* Removing the parent object from the table

delete from smofobjpar where parentobj = 'CUSTOMER_MAIN'.


IF sy-subrc = 0.

WRITE : 'Done'.

ENDIF.


*****************************************************************************


So that we can remove the parent adapter object.


Here removing the entry from a table is not a big deal but understanding the significance of the deletion, aligning to the SAP Frameworks with Business requirement is more important.


  a_4.jpg


Now run the CUST_MAT_INFO, It will work for sure. :-)

AET extension for product

$
0
0


Since enhancement package 1 of CRM7.0, the following four set types were delivered for use by the AET extensibility tool. As a result they were added to black list in subroutine OKCODE_1000 (FuGr COM_ATTRIBUTE_NEW) to suppress generation by transaction COMM_ATTRSET. If you look into table COMC_SETTYPE and COMC_SETTYP_ATTR, the entries are there like other set types generated by COMM_ATTRSET.

-CRM_EXT_MAT

-CRM_EXT_SRV

-CRM_EXT_OBJ

-CRM_EXT_CMP


Later, probably, the following two set types were delivered as well.

CRM_EXT_FIN

CRM_EXT_FS


When new field is created by the AET tool for product object, e.g. object part, the field will be added into the set type (table COMC_SETTYP_ATTR) and corresponding Data Source (BW extractor) if the field is marked as BW relevant in AET tool, e.g. 0CRM_CRM_EXT_MAT_ATTR, automatically. The complete Data Source list is as following.


0CRM_CRM_EXT_CMP_ATTR

0CRM_CRM_EXT_FIN_ATTR

0CRM_CRM_EXT_FS_ATTR

0CRM_CRM_EXT_MAT_ATTR

0CRM_CRM_EXT_OBJ_ATTR

0CRM_CRM_EXT_SRV_ATTR


The above Data Sources were generated by report COM_DS_GENERATE_SETTYPE for the corresponding set type. The following program were generated at same time. The report will populate table COMC_CRD_GEN_BWO with an entry for a set type when generating Data Source.

CRM_EXT_MAT: GP69LK5A3UAOAXVKGKLNM88Y15C

CRM_EXT_SRV: GP1Q5PQXVK7BY1RSGY2UCGD164U

CRM_EXT_OBJ: GP5I3Y6086FKQY08OSHH6LA88N2

CRM_EXT_CMP: GP7HY8EETJN5W8UFMXZVJVHUXJI

CRM_EXT_FIN: GP7L2YTQ2NFYO5BVB0WUY2QGK2P

CRM_EXT_FS: GP7L2YTQ2NFYO5BVB0QXPY198CU

How to indicate mandatory fields on Business Partner UIs

$
0
0

I noticed that the following often required functionality seems to be rarely known:


As of SAP CRM 7.0 EHP 2 mandatory fields can be visually indicated in the following CRM WebClient UI applications:

  • Accounts
  • Contacts
  • Employees


Mandatory fields defined for a business partnerrole are marked, that is mandatory fields defined in Customizing for Cross-Application Components, under SAP Business Partner -> Business Partner -> Basic Settings -> Field Groupings -> Configure Field Attributes per BP Role.


For enabling this functionality you need to activate the business function CRM_TCI_1.


I would say reading the information related to this business function (documentation, release information) helps you to understand all details that you possibly need.

Relationship Data replication from ECC TO CRM

$
0
0

If you download a partner role from R/3 to CRM, a sales area-independent relationship is created in addition to the sales area-dependent partner function in CRM. You can no longer delete this from R/3 by a download in the standard system since a relevant object does not exist in R/3. So when you change the relationship (partner role from ECC) and download to CRM system rather than updating the existing relationship a new record gets created. The old records still remain in the system.

Requirement:

To delete the OLD relationship that exists in CRM system in BUT050 table.

There is an SAP Note which is valid for only CRM Release 3.0 - 4.0.

497146 - Rel. in CRM remains after download of partner function Deletion


Conditions checked:

·         Sales Org

·         Relationship category – ZW/ZR


Standard Function Module: CRM_BUPA_MTCS_REL

Create an Implicit Function Module:Z0CR_DELETE_REL_ECC_CRM

1.png


ET_REL_EXTERN is the structure will be having the data that is downloaded from ECC.

Get all the data like partner, partner2, sales org, relationship category.

2.png


check for the relationship category and sales org.


3.png


Check if there is already an entry in CRM with the ET_REL_EXTERN data


4.png


2 .Steps to be done if the record already exists in CRM

·         Delete the relationship from CRM using the FM BUPA_RELATIONSHIP_REMOVE.

·         Delete the record from ET_REL_EXTERN, if we don't remove the record from this structure then it will create a new record in CRM with this data


5.png


To test (Debug) this functionality (FM):

Change the used/Password for CRM System maintained in SM59 of ECC system.

In ECC system in SM59 we need to save the ID/PASSWORD and then we can use the user to debug the FM.


7.png


Before Relationship Change in ECC

·         In ECC system below three customers are having ZW relationship maintained as in below screen shots.


8.png


In In CRM system

10.png

Request Download:

Define the queue with the partner1, partner2 and relationship category

TCODE: R3AR2

1.png

Then download the queue: R3AR4


2.png


3.png


Then check the queues SMQ2/SMQ1.

Go to SMW01 and check the BDOC Generated:


3.png


4.png


5.png

6.png


N  Now check the tables in CRM, only one relationship should exist.

11.png

H  Hope it helps!!!


SAP Set Types

$
0
0

Introduction – Set Types and Attributes


Set Types and Attributes: Set Types are the group of different attributes which are assigned to Product/Material and are available on Product Page in CRM System. These Set Types are stored in system as a table which contains records.

Set Types and Attributes are used together with Product Hierarchy and Categories created.

A correct combination of set types with its hierarchy & category allows it to get displayed on Product page ‘COMMPR01’.


Product Hierarchy: Product Hierarchy is mainly used to structure all the Product related data, this Hierarchy depends on individual Organization requirement and process.


This Product Hierarchy consists of Product Category which is useful for categorization of Product.

Categories are assigned to Hierarchy and one Hierarchy can contain multiple categories at different level e.g. Parent and Sub category.

These Sub Categories can contain multiple Set Types with different attributes assigned to them.

For above relationships refer Figure 0:


clip_image002


Figure 0 – Set Type Relationship


COMM_ATTRSET” is the Transaction Code for creating Attribute and Set Type in SAP CRM system.

Set Types can be created only for Material/Product objects in CRM system and not for any other Objects. Set Types are customized attributes of Object Material/Product in addition to the standard attributes.

Following Figure 1 shows Set Type name “ZWATCH_SET_TYP” and Attribute name as “ZWATCH_MODELS”.

Step 1: Create Attribute


Launch the T-Code “COMM_ATTRSET” to Create Attribute.


clip_image003


Figure 1– Creating Attribute

Attributes basically contains of two tabs, one for Definition and other for Value Range. Definition defines the characteristics of the attribute and Value Range provides option for fixed range values. Definition and Value Range are shown in Figure 2 and 3 respectively.


clip_image004


Figure 2– Defining Characteristics

Refer to Attribute “ZWATCH_MODELS” in Figure 3 for value range.


clip_image006

Figure 3– Assigning Values


Step 2: Create Set Type


The Set types can be created as shown in Figure 4, the assignment of attributes to the created set type is discussed further. Refer Figure 4 for creation of Set Type.


clip_image007

Figure 4– Creating Set Type


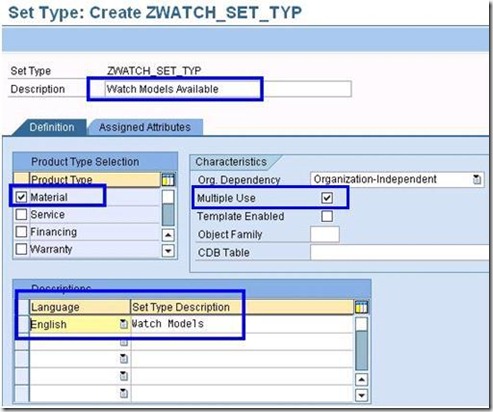
The Set Type creation requires defining the set type and assigning attributes to it. The definition part contains option for ‘Product type selection’ and other details related to characteristics, refer Figure 5.


clip_image009


Figure 5– Defining Set Type Characteristics

Definition of single or multiple values can be done with check “Multiple Values Possible” option. With the above option checked each record of a set type is assigned indirectly to a product using an assignment table.


clip_image010

Figure 6– Defining Set Type Characteristics


clip_image011


Figure 7 – Multiple value attribute


Now created Attribute needs to be assigned to Set Type, refer Figure 8.


clip_image013

Figure 8– Assigning Attribute

The steps so far showed the process to create attribute and then create a set type with reference to the attribute. The next part of the document discusses about hierarchy and how set type can be attached to screens so that users can access it.

Step 3: Create Hierarchy


In its basic form hierarchy is used to maintain the products or the object within certain criteria for differentiation. This configuration depends on individual organizations process flow.

Hierarchy can have multiple levels depending upon the information flow for any product or Object.

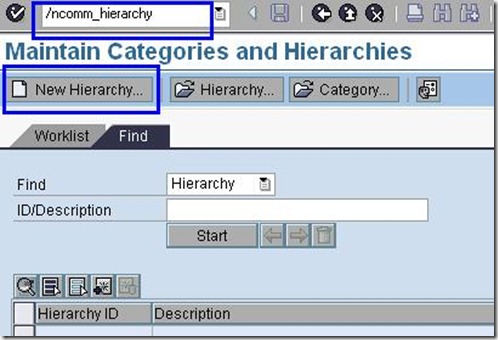
COMM_HIERARCHY” is Transaction code to create Hierarchy, refer Figure 9.


clip_image014

Figure 9– Creating Hierarchy


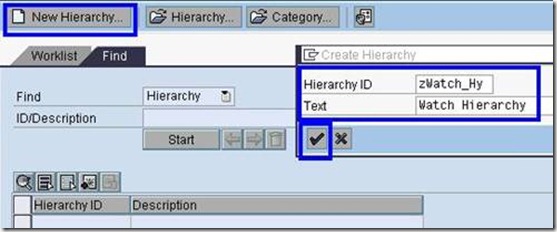
When New Hierarchy button is clicked, Hierarchy ID and its descriptions are entered, refer Figure 10.

clip_image016

Figure 10– Defining Hierarchy ID


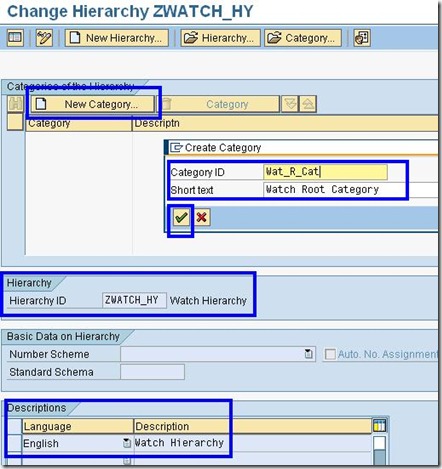
When Hierarchy is created (by pressing OK button), the following screen insists for category creation. Categories, similar to hierarchy groups products and individual objects based on different criteria.

These Categories are arranged in Hierarchy, and Set Types are arranged in Categories.

These Categories can also have multiple level for Example one Root Category is mandatory and inside that Root Category there are multiple child categories.

The information shown in below Figure 11, Figure 12 and Figure 13 contains a hierarchical structure,

The reason why this has been created is to allow for flexibility in defining products.

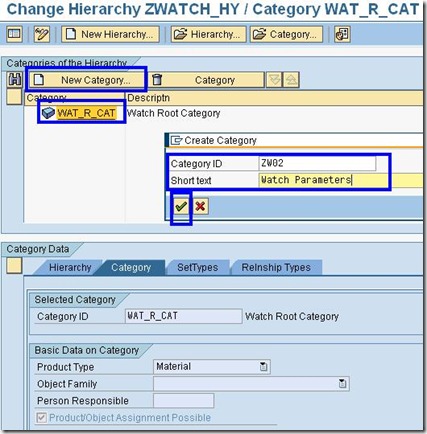
Step 4: Create New Category


clip_image017

Figure 11– Creating Root Category

clip_image018


Figure 12– Setting Product Type for Category

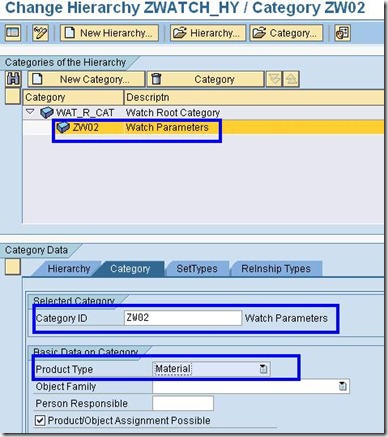
Creating Child Category “ZW02” under Root Category “WAT_R_CAT”, refer Figure 13

Step 5: Create New Sub Category


clip_image019

Figure 13– Creating Sub Category


When creating sub-category we need to set the Product Type as Material, refer Figure 14


clip_image020

Figure 14– Created Sub Category


Now we have got one hierarchy “ZWATCH_HY” within which we have got one Root Category “WAT_R_CAT” and again within this Category we have got another sub-category with name “ZW02”.

· ZWATCH_HY : HIERARCHY NAME

· WAT_R_CAT : ROOT CATEGORY NAME

· ZW02 : SUB-CATEGORY NAME


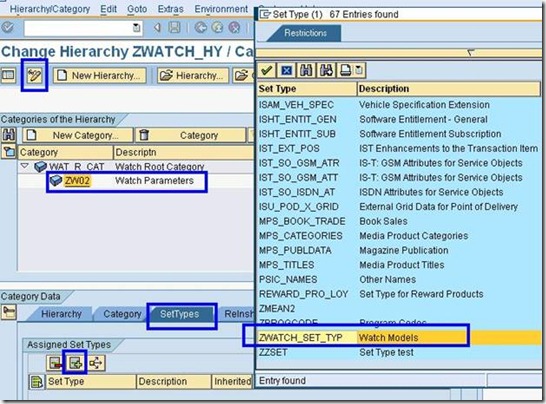
Step 6: Assign Set Types to Category


To assign Set Type to a particular Category refer Figure 15.


clip_image022

Figure 15– Adding & Assigning Set Type to Sub-Category


After assigning Set Types to a Category, refer Figure 16, Along with this we need to set two attributes Position and View-ID of that Set Type.


Both of these parameters are used to configure the availability of this Set Type in Product Master. In Our Example we have set Position = 0 and View ID = Basic (Figure 16 and Figure 17), so according to this configuration, newly added Set Type will get displayed at Position 0 in General Tab, refer Figure 18.


clip_image024

Figure 16– Setting Position and View-ID


clip_image026


Figure 17– Position and View-ID


clip_image028

Figure 18


In Figure 17 we have assigned our created Set Type to Category “ZW02”. Now we are all set to use this Set Type in our Product/Material screen.

To use this Set Type in Product/Material Screen we need to move to another Transaction Code “COMMPR01” to open Product/Material Details, refer Figure 19.


clip_image030

Figure 19– Adding Sub Category to Product Page


Here we need to add our Set Type (T-Code “COMMPR01”). Click on SAP Basic Data Tab and then click on Edit button so that changes to the screen data are made.

Now when the Screen is open to edit, enter the Category in SAP Basic Data tab and press Enter, rest of the information about that Category will automatically be populated, refer Figure 19. This information will contain the Hierarchy ID and Category Description.

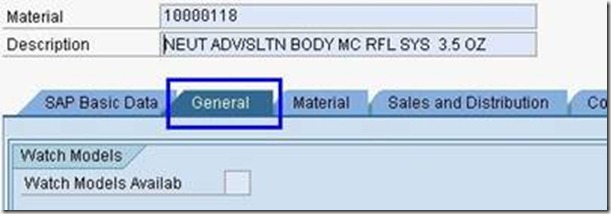
When once all information is entered, the document can be saved. Now, when transaction code “COMMPR01” is executed the Set Types can be seen under general tab, refer Figure 20.


clip_image032

Figure 20– Displayed Set Type on Product Page


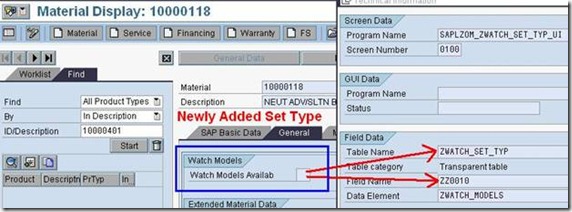
Above Figure 20 shows the value range that we have defined while creating Set Type, this value range will be available as F4Help along with Set Type. For table and field details refer Figure 21.


clip_image034

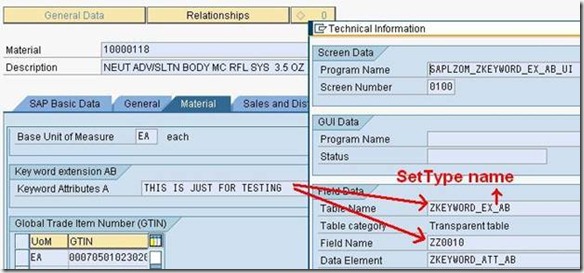
Figure 21– Set Type Table and Field name


All information that will be saved through this Set Type will be stored in table “ZWATCH_SET_TYP” this table name is same as that of Set Type name, having one field “ZZ0010” which will actually store this value shown, refer Figure 22


clip_image036


Figure 22– Set Type Table with Saved Information


While creating a Set Type one table gets generated automatically (“ZWATCH_SET_TYP”) which stores the Set Types value, refer Figure 23


clip_image038


Figure 23– Set Type Table Structure (Fields)

Step 1: Code Demo


The steps/processes so far discussed (creation of Attributes, Set Types, Hierarchy, Category and finally Sub Category) were from functional aspect.

After that we have to assign this Category to Products using T-Code “COMMPR01” (Product master workbench).

The following section provides technical information on how to update set types trough ABAP.


Example


Function Module “Z_UPDATE_EXT_AB” which explains how to update information in Set Type programmatically.

Figure 24 shows the Set Type under Transaction “COMMPR01” (Product master workbench).


clip_image039

Figure 24– Code Example Set Type


clip_image041


Figure 24– Code Example Set Type Table & Fields


Above Figure 24 shows Set Type “ZKEYWORD_EX_AB” which is used to demonstrate the ABAP code example.

Report Program to update value of Set Type


FUNCTION Z_UPDATE_EXT_AB.

*"----------------------------------------------------------------------
*"
*"Local Interface:
*"
  IMPORTING

*" REFERENCE(L_PRODUCT_ID) TYPE COMT_PRODUCT_GUID
*"
  REFERENCE(L_PROD_DESC) TYPE CHAR_50

*"----------------------------------------------------------------------
CONSTANTS:
  abap_true TYPE sap_bool VALUE 'X',
  lc_ptype TYPE char2 VALUE '01'.

DATA: lt_bapireturn TYPE bapiret2_tab, "
For Error Messages

  ls_bapireturn TYPE bapiret2,  "For Error Messages
  ls_product TYPE comt_product, "
Product Information

  lv_logsys TYPE comt_logsys.  "Logical system Name


DATA: lt_product TYPE comt_product_maintain_api_extt,
  ls_prod_chg TYPE comt_product_maintain_api_ext,

  lt_set TYPE comt_product_maintain_api_sett,
  ls_set TYPE comt_product_maintain_api_set,

  lt_key TYPE REF TO zkeyword_maintain_abt,
  ls_key TYPE zkeyword_maintain_ab.

  ls_product-product_type = lc_ptype. "
Passing Product Type

  ls_product-product_guid = l_product_id. "Passing Product GUID
  ls_prod_chg-header-com_product = ls_product.

  ls_set-settype_id = 'ZKEYWORD_EX_AB'. "
This is SetType Name

  ls_key-data-logsys = 'BC1CLNT100'.  "This is Logical system
  CREATE DATA lt_key.
  ls_key-data_x-zz0010 = abap_true. "
Need to pass abap_true

  ls_key-data-zz0010 = l_prod_desc.

  APPEND ls_key TO lt_key->;*.


  ls_set-data = lt_key.

  APPEND ls_set TO ls_prod_chg-data.


  CLEAR ls_set.

  APPEND ls_prod_chg TO lt_product.


  CALL FUNCTION 'COM_PRODUCT_MAINTAIN_MULT_API'

  IMPORTING

  et_bapireturn = lt_bapireturn

  CHANGING

  ct_product = lt_product

  .

   IF sy-subrc <;> 0.

   ENDIF.


  CALL FUNCTION 'COM_PRODUCT_SAVE_API'

  EXCEPTIONS

  OTHERS = 0.


  CALL FUNCTION 'BAPI_TRANSACTION_COMMIT'

  EXPORTING

  WAIT = 'X'

  IMPORTING

   RETURN = ls_bapireturn.


ENDFUNCTION.


How to archive and delete products in a CRM Production System

$
0
0

In SAP CRM a report is available to delete products from the system called COM_PRODUCT_DELETE_SINGLE (also COM_PRODUCT_DELETE_ALL).


This report however cannot be run on a production system and it contains code to check and prohibit this. The reason for this is because SAP do not recommend deleting master data from a production system.


However it can happen that for whatever reason, it is necessary to remove a product or products from a production system. The best and recommended
way to do this is to archive the product in question.


This document provides a detailed step by step description of the steps required in order to achieve this. It is something I have been asked to provide in the past and thought it was a good idea to share in general.


The following are the steps required


1. Mark the product you wish to archive. The easiest way to do this is to use transaction COMMPR01.

Capture.PNG


If you wish to mark more than one product as 'to be archived' then create the report ZCHANGE_PRODUCT_STAT.

Please see SAP note 768918 for more information on this. Once created, run the report in your system by providing the desired product ID’s.


2. Next run transaction with Archiving object = PRODUCT_MD. Hit Enter and you will see the following steps:

capture001.png


3. Preproc -> Click on this button create your own variant and include the product ID(s) to be archived. Note that these product ids are the ones marked ‘to be archived’ as mentioned in step 1.

Capture002.PNG

Next click on the 'Start date' and select 'Immediate' and Save. Now click on 'Spool Params' and select an output device (this is something you must decide or your basis team can help. This parameter will output the archived product in a flat file)

After this hit the Execute button to execute the preproc step.


4. You will again be taken to the main SARA screen. Now click Write button. Maintain 'Start Date' and 'Spool Params' as above, then execute the Write step by hitting the Execute button again


5. Again in the main screen, click the 'Delete' button. In the archive selection button, a pop up will be thrown up. Select the recent file which has been created (it will be mostly with the current date). This file is the one which was created earlier.

capture003.png

6. From the main screen, Execute the 'Delete' step in the same way as described above using the Execute button.


7. Again in the main screen, click 'PostProc' button. Execute the 'PostProc' step by hitting the execute button. Once this step has completed, the product will be archived


At any time during the process, you can check what has happened at each step by clicking on the Job icon. Here you will see the details as follows:

Capture004.PNG


Please also refer to SAP Note 768918

How to clear FL.dat files in DATA folder /usr/sap///data

$
0
0

If you see a lot of files FL<date>.dat in DATA directory /usr/sap/<XXX>/<XXX>/data and they may take up too much space, please refer to the following information about what these are used for and how to delete them.


FL<Date>.dat files are written when you have activated the message flow statistics via transaction SMWMFLOW (menu GOTO -> activate statistics). The
files are condensed via a report called RSMWM_BSTAT_COLLECTOR (or using t-code SMWMFLOW-> Message Flow Statistics). The results can be displayed in transaction SMWMFLOW.


If you do not want to have those statistics, you can delete the files and deactivate the statistics as they only contain non business relevant statistical data.

  1. To prevent a quick growth in the size of these files, you can reduce the retention time  in t-code ST03 -> Expert Mode -> Collector and Performance
    DB -> Performance Database -> Reorganization -> For standard data.
  2. To stop the statistics files to be generated or to delete the files, you can go to t-code SMWMFLOW, choose menu GOTO-> Activate statistics-> middleware message flow statistics. The functionality can be switched off by pressing button "switch on/off". The statistics files can be deleted by pressing button "delete statistic file".


I put the same information in the following KBA. I hope it helps.


2031363 - FL.dat files take up too much space in DATA folder /usr/sap///data

convert logical system by BDLS after client copy in CRM landscape

$
0
0

After client copy in CRM landscape, the logical systems in tables are referring to the old system, so that we need to convert them for the new systems.


Therefore, please ensure BDLS is run for 3 times after client copy in CRM landscape:


(1)Once on the R3 Backend system, in order to convert the logsys entry from the old value to the new one in all relevant tables.

(2) A further time on the CRM to convert all corresponding table entries from the old CRM logical system value to the new one.

(3) Additionally, there are tables on the CRM which refer to the logical system value of the R3; for this reason it is necessary to run BDLS a second time on the CRM, in order to convert entries from the old R3 Logical System value to the new one in these tables.


Transaction BDLS is works in such a way that all tables are checked for fields defined with data dictionary element of DDIC type "LOGSYS" and "EDI_PARNUM". Any fields defined in SE11 with either of these data elements referring to the olg logical system value should be changed to the new value. No other field values are modified by BDLS.


To find out whether the table is to be converted by BDLS, please go to SE11, enter the name of the table and and double click on the Data Element of the field containing the logsys value. Then please check whether the Data Element has its 'Domain' defined as"LOGSYS" or "EDI_PARNUM" .


I am sorry for an earlier blog that saying the product tables such as COMM_PRODUCT cannot be converted by BDLS. The logical system field LOGSYS of table COMM_PRODUCT should also be converted.


Though the data element is COMT_LOGSYS, but the domain is actually LOGSYS:


1.png


2.png


Related Note/KBA:


418886 - Download: Products not found or not changeable

757093 - FAQ:Analyzing CRM Client Copy problems

2109659 - Which tables are modifed by BDLS?

How to debug CRM outbound queue for upload without de-registering the RFC destination

$
0
0

Sometimes when we do data upload from CRM to ERP and get ERP errors, we want to debug into ERP from the LUW in CRM outbound queues.


Usually we do this by de-registering the RFC destination in the outbound scheduler in SMQS. However, this is sometimes incovenient because all outbound queues for this RFC destination is stopped and this may affect other users, and also you may not be authorized to de-register the queues.

1.png

Therefore now we introduce a way to debug the outbound queue without de-registering.

Please refer to the following steps:


(1)set a breakpoint in method  CL_SMW_MFLOW->PROCESS_OUTBOUND at line 37 (after calling cl_smw_mflow-> set_header_fields).


2.png


If you are updating the application data in SAP GUI, please set a session breakpoint.

If you are updating the application data in SAP WebClient UI, please set an external breakpoint. (If this external breakpoint is not called afterwards, please activate it in all servers in tcode SRDEBUG).


(2)Process the application data and save.  e.g. Save after creating/changing business partners or business transactions.


(3)The program stops at the breakpoint.

Please change the variable "ls_header-dbgmode" to value 'X' :


3.png

Then press F8 .


(4)Go to Tcode SMW01 to view the Bdocs.  The Bdoc will have status "To be processed (Debug)".


Please enter "/h" to activate the debugger and then select the Bdoc and press the "reprocess" button.

(Please note that this is actually a "process" and not a "reprocess" because we set to debug mode and the Bdoc is not yet processed.)

5.png


(5) Then it goes to debug mode.

If you are using new debugger, please select the menu path : [Settings-> Change debugger Profile/ Settings]

6.png

Please set the flag "block sending" and continue.

7.png


If you are using classic debugger, please refer to the following screenshot:


8.png


After setting this flag, please press F8.


(6) In the popup, please press "yes".


(Please ignore this message because this is actually a "process" and not a "reprocess" because we set to debug mode and the Bdoc is not yet processed.)

9.png


(7)Go to tcode SMQ1 (or use the queue monitor in SMQS), you will find the queue is stopped with status "Ready" :


10.png


(8)double click on the queue name twice and you can debug the LUW now.


11.png

Press the "debug LUW" buton and then you debug into ERP. (This requires the RFC user to be "dialog" type.)

12.png

Viewing all 62 articles
Browse latest View live


<script src="https://jsc.adskeeper.com/r/s/rssing.com.1596347.js" async> </script>